Thursday, September 28, 2006

How to use your PC and Webcam as a motion-detecting and recording security camera

How to use your PC and Webcam as a motion-detecting and recording security camera


This tutorial will take you step-by-step through setting up your PC and Webcam to act as a motion-detecting and recording security camera system. And the software required to do this is open source (free).


Why?
What?
How?
Advanced includes: Multiple Webcams, Sending pictures to a remote location (FTP), How to duct-tape the light off your webcam (super-stealth)
Examples
Coming soon: How to do the same thing, with a Mac.


Why?


6 Reasons to set up a motion activated web-cam


  1. Maybe you live in a questionable (at best) part of East Vancouver and you’ve already been broken into (while you were doing the dishes). It would be helpful next time to have pictures of the intruder.
  2. Maybe you’re trying to prove to your landlord that some of the more questionable members of the general East Vancouver public are using the pathway between your building and the one next door as a shortcut between streets. Often with very large bags of cans (it’s a Vancouver thing). Loudly. At all hours of the day and night.
  3. Perhaps you want to catch someone using your PC after you’ve asked them repeatedly not to use it (because they seem to go out of their way to install spyware, toolbars you don’t want, and leave behind Britney Spears mp3s on your desktop)
  4. You’re bored?
  5. You want to get pictures of the pretty birdies eating from your new bird feeder.
  6. Yeah I know what you were expecting here, that’s lewd. Get your mind out of the gutter, this is a family site.

What?


For this tutorial you’ll need:


  1. a PC running Windows 98, ME, 2000, XP (the software is untested on Windows 95 and NT, but should work)
  2. a webcam (or two, see advanced)
  3. Dorgem - an open source (free) webcam utility.

To upload images ‘off-site’ (in case someone steals your computer) you’ll need an FTP account. See the Advanced section when you’re done the initial setup.


How?


  1. Install (if it isn’t already) your webcam. If you’re pulling one out of the closet and have long since lost the install CD, here are links to download the drivers for some of the most common webcam vendors:

    Creative Labs
    Logitech
    Labtec
    D-Link


  2. Download and install Dorgem. The installation is very straight forward, you’ll mostly click Next a bunch of times.
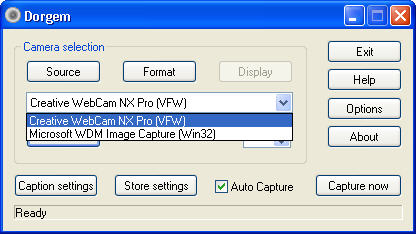
  3. Launch Dorgem and select your Webcam from the Camera selection drop-down list.

    security web cam dorgem
    click to enlarge


  4. Click the Preview button to display the view your webcam has. Physically adjust the camera to face the area you want to monitor.

    security web cam dorgem


    security web cam dorgem


  5. Click the Source button and make any adjustments to the Brightness, Contrast and/or other settings. Click OK when you’re happy with the results.

    security web cam dorgem
    click to enlarge


  6. Click the Options button

    security web cam dorgem
    click to enlarge


  7. Place a check in the box labeled Use motion detection. Certain Webcams (most often Labtec) can require Dorgem to "reconnect" after a certain period of no motion being detected. For now leave this box unchecked. If you notice that your Webcam isn’t capturing any images even though it should have, revisit this section and place a check in the box. It should be noted that if you do need to use this setting, your cam will likely take a picture every time Dorgem "reconnects" to it, so try using 5 minute (or higher) intervals. Otherwise you’ll end out with a LOT of pictures, most of which won’t have captured actual "motion".

    security web cam dorgem
    click to enlarge


  8. Click OK after you have enabled motion detection to return to the main Dorgem window. Now you’ll need to create a ‘profile’ - which Dorgem refers to as Storage events. Click the Store settings button to create an event.

    security web cam dorgem
    click to enlarge


  9. Choose File and click OK (adding an FTP event is covered in the Advanced section, set a local file first to make sure everything works)

    security web cam dorgem


  10. Enter a Name: for this event, make sure Enable is checked, and then set an interval. Since you’ll be using motion detection, you probably want to capture images fairly "closely together" - so try 1 or 2 seconds. If you know for certain that this camera will detect a lot of motion (your camera faces an area with a lot of movement) you may want to set this somewhat higher. This setting can always be changed later, so experiment a bit. Click the … button next to Filename:

    security web cam dorgem
    click to enlarge


  11. Here you’ll be setting the folder to save images to, and the actual filename for each image. Dorgem allows special characters in file names so that each name is unique (otherwise each time your camera detected motion it would take a picture and over-write the previous one). Somewhere in the file name, enter the characters %g - which will give your file name a time-stamp. If you use %G in the file name, it will also add the current year.

    Because my camera is taking pictures of movement on my patio, I named the file patio-camera%G%g. This results with images being saved as patio-camera20060926165001.jpg. Broken down that’s patio-camera - the current year - the current month, day, hour, minute and second. Click OK after you’ve selected a folder and file name.

    security web cam dorgem
    click to enlarge


  12. Click OK

    security web cam dorgem
    click to enlarge


  13. Click Close to return to the main Dorgem widow

    security web cam dorgem
    click to enlarge


  14. Wave your hand in front of the camera. Or throw something within its view. Jump around in front of it like an idiot. If everything was set correctly, you should now have some images in the folder you specified. Go take a look..

    moron


  15. If it didn’t work, start again at step 3 and double-check everything. The built-in Help file included with Dorgem is actually pretty helpful - use it for troubleshooting. Feel free to leave a comment below and include as much info as possible and I’ll try to help as well.

Advanced


Multiple Webcams


If you can get more than one Webcam to work in Windows (not always an easy task, esp. if they’re Labtec), Dorgem can support them all. You don’t need to install another copy of Dorgem, but you do need to start each instance differently. To do so, follow the steps below..


  1. Right-click on your current Dorgem desktop icon and select Create Shortcut

    security web cam dorgem
    click to enlarge


  2. You should see a new Dorgem (2) icon on your desktop - right-click on it this time, and choose Properties

    security web cam dorgem
    click to enlarge


  3. Make sure the Shortcut tab is selected, and change the Target: to:

    "C:\Program Files\Dorgem\Dorgem.exe" /c:cam2


    If you installed Dorgem to somewhere other than the default location, make the appropriate changes.

    security web cam dorgem
    click to enlarge


  4. Click Apply and then ok to return to your desktop. Double-click the Dorgem (2) icon. When it launches, notice that it’s titled Dorgem (cam2). Repeat the same steps you did for the first camera (though choose a different file name to save the image as).

    security web cam dorgem
    click to enlarge


Sending pictures to a remote location (FTP)


If you’re using this as a personal security system for your residence, you may want to store the files off-site, in case someone steals your computer (rendering your security totally useless). To do so, follow these steps.. (note: you’ll need an FTP account - check to see if your ISP provides one for you, eg. Personal Web Space/storage).


  1. Click the Store settings button and then click Add.

    security web cam dorgem
    click to enlarge


  2. This time select FTP and then click OK

    security web cam dorgem


  3. Enter in the required information. The file name can use special characters (see step 11 in the first How part of this tutorial). You may have to experiment with some of these settings. For example, I have to use Passive mode because of the way my home network is set up. You may not. Click OKwhen all of the required info has been entered.

    security web cam dorgem
    click to enlarge


  4. Wave your hand in front of the webcam (or throw something through its field of view). Check your FTP site and you should see a new file (or files) there. Note: when I have both save to my local hard drive and save to FTP enabled, only one works. You may need to disable the local copy if you want FTP to work. If you figure out a way for both to work, by all means let me know.

How to duct tape the light off your webcam (super-stealth)


  1. Does your webcam have an annoying light that gives away its location when you try to hide it?

    fine i will never be a pro photographer


  2. Find some duct tape that matches the colour of your camera. Or, masking tape and a marker.

    fine i will never be a pro photographer


  3. Place tape over the light.

    fine i will never be a pro photographer


  4. Your camera will now blend in like a ninja. Extra bonus: use the duct tape to hold your hidden camera in place.

Powered by Post2Blog Express

Tuesday, September 26, 2006

Life in the 1500s


Interesting!

The next time you are washing your hands and complain because the water temperature isn’t just how you like it, think about how things used to be. Here are some facts about life in the 1500’s:

These are interesting...


Most people got married in June because they took their yearly bath in May, and still smelled pretty good by June. However, they were starting to smell, so brides carried a bouquet of  flowers to hide the body odor. Hence the custom toda y of carrying a bouquet when getting married.


Baths consisted of a big tub filled with hot water. The man of the house had the privilege of the nice clean water, then all the other sons and men, then the women and finally the children Last of all the babies. By then the water was so dirty you could actually lose someone in it. Hence the saying, "Don’t throw the baby out with the bath water."


Houses had thatched roofs-thick straw-piled high, with no wood underneath. It was the only place for animals to get warm, so all the cats and other small animals (mice, bugs) lived in the roof. When it rained it became slippery and sometimes the animals would slip and  off the roof. Hence the saying "It’s raining cats and dogs."


There was nothing to stop things from falling into the house. This posed a real problem in the bedroom where bugs and other droppings could mess up your nice clean bed. Hence, a bed with big posts and a sheet hung over the top afforded some protection. That’s how canopy beds came into existence.


The floor was dirt. Only the wealthy had something other than dirt. Hence the saying "dirt poor." The wealthy had slate floors that would get slippery in the winter when wet, so they spread thresh (straw) on floor to help keep their footing. As the winter wore on, they added more thresh until when you opened the door it would all start slipping outside. A piece of wood was placed in the entranceway.

Hence the saying a "thresh hold."


(Getting quite an education, aren’t you?)


In those old days, they cooked in the kitchen with a big kettle that always hung over the fire. Every day they lit the fire and added things to the pot. They ate mostly vegetables and did not get much meat. They would eat the stew for dinner, leaving leftovers in the pot to get cold overnight and then start over the next day. Sometimes stew had food in it that had been there for quite a while. Hence the rhyme, "Peas porridge hot, peas porridge cold, peas porridge in the pot nine days old."


Sometimes they could obtain pork, which made them feel quite special. When visitors came over, they would hang up their bacon to show off. It was a sign of wealth that a man could "bring home the bacon." They would cut off a little to share with guests and would all sit around and "chew the fat."


Those with money had plates made of pewter. Food wit h high acid content caused some of the lead to leach onto the food, causing lead poisoning death. This happened most often with tomatoes, so for the next 400 years or so, tomatoes were considered poisonous.


Bread was divided according to status.. Workers got the burnt bottom of the loaf, the family got the middle, and guests got the top, or "upper crust."


Lead cups were used to drink ale or whisky. The combination would sometimes knock the imbibers out for a couple of days. Someone walking along the road would take them for dead and prepare them for burial. They were laid out on the kitchen table for a couple of days and the family would gather around and eat and drink and wait and see if they would wake up. Hence the custom of holding a "wake."


England is old and small and the local folks started running out of places to bury people. So they would dig up coffins and would take the bones to a "bone-house" and reuse the grave. When reopening these coffins, 1 out of 25 coffins were found to have scratch marks on the inside and they realized they had been burying people alive. So they would tie a string on the wrist of the corpse, lead it through the coffin and up through the ground and tie it to a bell. Someone would have to sit out in the graveyard all night (the "graveyard shift") to listen for the bell; thus, someone could be "saved by the bell" or was considered a "dead ringer."


And that’s the truth... Now, whoever said that History was boring ! ! !


Educate someone. Share these facts with a friend
Powered by
Post2Blog Express

Monday, September 25, 2006

Can a python bite off more than it can chew? Ewe bet

burp


A LITTLE bloating after a big meal is an occupational hazard for pythons. But this unfortunate creature found itself unable to slink away and sleep it off.


In fact, after swallowing a pregnant sheep, it couldn’t move at all.


Firemen in the Malaysian village of Kampung Jabor, about 190km east of Kuala Lumpur, easily caught it after it was spotted on a road.


Conservationists were yesterday still deciding whether to keep the 90kg snake in a zoo or release it back into the wild.


Pythons eat no more than once a week but when they open their incredible hinged jaws, anything is fair game.


This 5.5m python found its eyes were definitely bigger than its belly.


In July surgeons were forced to operate on a 4m Burmese python after it inadvertently swallowed a queen-size electric blanket.


Humans also have become victims. In 1972 a python in Burma swallowed an eight-year-old boy.


But sometimes their food really doesn’t agree with them.


In October last year, a 3.6m python came off second best in Everglades National Park in Florida.


The snake, which tried to swallow a 1.8m alligator whole, exploded, said scientists who found the gory remains.


http://www.news.com.au/dailytelegraph/story/0,,20372915-5006003,00.html


Powered by Post2Blog Express

Expensive Cameras in Checked Luggage

Expensive Cameras in Checked Luggage


This is a blog post about the problems of being forced to check expensive camera equipment on airplanes:


Well, having lived in Kashmir for 12+ years I am well accustomed to this type of security. We haven’t been able to have hand carries since 1990. We also cannot have batteries in any of our equipment checked or otherwise. At least we have been able to carry our laptops on and recently been able to actually use them (with the batteries). But, if things keep moving in this direction, and I’m sure it will, we need to start thinking now about checking our cameras and computers and how to do it safely. This is a very unpleasant idea. Two years ago I ordered a Canon 20D and had it "hand carried" over to meet me in England by a friend. My friend put it in their checked bag. The bag never showed up. She did not have insurance and all I got $100 from British Airways for the camera and $500 from American Express (buyers protection) that was it. So now it looks as if we are going to have to check our cameras and our computers involuntarily. OK here are a few thoughts.

Pretty basic stuff, and we all know about the risks of putting expensive stuff in your checked luggage.


The interesting part is one of the blog comments, about halfway down. Another photographer wonders if the TSA rules for firearms could be extended to camera equipment:


Why not just have the TSA adopt the same check in rules for photographic and video equipment as they do for firearms?

All firearms must be in checked baggage, no carry on.


All firearms must be transported in a locked, hard sided case using a non-TSA approved lock. This is to prevent anyone from opening the case after its been screened.


After bringing the equipment to the airline counter and declaring and showing the contents to the airline representative, you take it over to the TSA screening area where it it checked by a screener, relocked in front of you, your key or keys returned to you (if it’s not a combination lock) and put directly on the conveyor belt for loading onto the plane.


No markings, stickers or labels identifying what’s inside are put on the outside of the case or, if packed inside something else, the bag.


Might this solve the problem? I’ve never lost a firearm when flying.


Then someone has the brilliant suggestion of putting a firearm in your camera-equipment case:


A "weapons" is defined as a rifle, shotgun, pistol, airgun, and STARTER PISTOL. Yes, starter pistols - those little guns that fire blanks at track and swim meets - are considered weapons...and do NOT have to be registered in any state in the United States.

I have a starter pistol for all my cases. All I have to do upon check-in is tell the airline ticket agent that I have a weapon to declare...I’m given a little card to sign, the card is put in the case, the case is given to a TSA official who takes my key and locks the case, and gives my key back to me.


That’s the procedure. The case is extra-tracked...TSA does not want to lose a weapons case. This reduces the chance of the case being lost to virtually zero.


It’s a great way to travel with camera gear...I’ve been doing this since Dec 2001 and have had no problems whatsoever.


I have to admit that I am impressed with this solution.


Powered by Post2Blog Express

Thursday, September 07, 2006

Magic Numbers

Enjoy the magic of numbers and appreciate some incredible mathematical coincidences:

3 x 37 = 111
6 x 37 = 222
9 x 37 = 333
12 x 37 = 444
15 x 37 = 555
18 x 37 = 666
21 x 37 = 777
24 x 37 = 888
27 x 37 = 999

1 x 9 + 2 = 11
12 x 9 + 3 = 111
123 x 9 + 4 = 1111
1234 x 9 + 5 = 11111
12345 x 9 + 6 = 111111
123456 x 9 + 7 = 1111111
1234567 x 9 + 8 = 11111111
12345678 x 9 + 9 = 111111111


12345679 x 9 = 111 111 111
12345679 x 18 = 222 222 222
12345679 x 27 = 333 333 333
12345679 x 36 = 444 444 444
12345679 x 45 = 555 555 555
12345679 x 54 = 666 666 666
12345679 x 63 = 777 777 777
12345679 x 72 = 888 888 888
12345679 x 81 = 999 999 999


11 x 11 = 121
111 x 111 = 12321
1111 x 1111 = 1234321
11111 x 11111 = 123454321
111111 x 111111 = 12345654321
1111111 x 1111111 = 1234567654321
11111111 x 11111111 = 123456787654321
111111111 x 111111111 = 12345678987654321


There is also the magic number 142857, which simply changes the order of its digits when multiplied -

142857 x 1 = 142857
142857 x 2 = 285714
142857 x 3 = 428571
142857 x 4 = 571428
142857 x 5 = 714285
142857 x 6 = 857142
Other interesting equations with number 142857 are:
142857 õ 7 = 999999
142 + 857 = 999
14 + 28 + 57 = 99
142857 squared is 20408122449. If we split this number in two (20408 122449) and add them up: 20408+122449 = 142857